MobX – Simple State Management for React component

Few days ago I have taken a small presentation about MobX at my office, Bashundhora, P1.

It was a small miniconf at our office, where we are sharing our work experience on a specific technology or tools with each other.

And presently, I am using React at font-end heavily. For state management first I have tried Redux then after checked out MobX, I just loved it.

So here it goes my small slide about React and MobX.


//slides.com/emranulhadi/deck/embed?style=dark


Cheers !!! 🙂

TODO app using Express JS and MongoDB

From many days I was willing to learn Node JS. And I am very much impressed with Express JS (web framework for Node.js). It’s just awesome.

Very minimal learning curve, very fast to start and develop anything will be much faster.

So what you have to do first install node obviously and MongoDB as well. Then to manage the dependency and install packages you need npm. Through npm you can install all the packages. I will not go through the all the details like installation and so on. just want to share my thoughts via this application.

So If you wanna interested to start from or explore any existing app then take mine 🙂

Within parent directory only models, views, router and app.js that’s it and TODO app is ready.

I have used these packages for the todo app.

"dependencies": {
    "body-parser": "~1.10.0",
    "cookie-parser": "~1.3.3",
    "express": "~4.10.6",
    "express-session": "~1.9.3",
    "mongoose": "~3.8.21",
    "passport": "~0.2.1",
    "passport-local": "~1.0.0",
    "ejs": "~1.0.0",
    "passport-http": "~0.2.2"
},

What package are doing what, to see that just go to the npmjs and search via the package name then you can see the details.

As I have used bootstrap to design. So using bower you can install front end dependencies very easily.

"dependencies": {
    "bootstrap": "~3.3.1"
}

Whatever I just want to share the experience of Tasting  node js via Express. So I made a very simple and basic TODO app using Express JS and MongoDB as a database. You can clone or download the source code form the download link.

download


And start exploring Express. After Download, goto the app directory then run following commands.


$1: npm install   // To install all the node packages

$2: npm install -g bower // Install bower, If not already installed

$3: bower install  // To install front end dependencies

$4: npm install -g nodemon // To see the live change

$5: nodemon app.js  // To RUN the app. 

App listening to the 3000 port. So browse http://localhost:3000 . You will get the homepage.

So What have in my small tiny app.

  • User Registration
  • User Login
  • User Basis task listing
  • User can add, edit, delete and checked any task

That’s it.

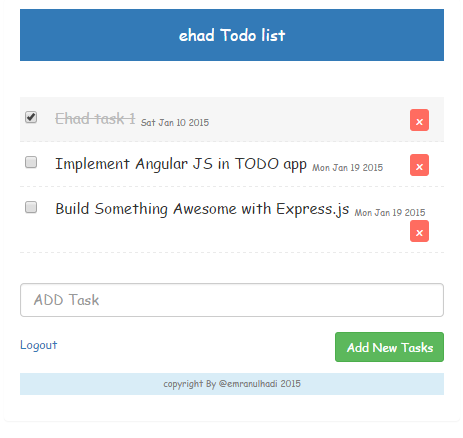
Here is the screenshot of TODO app for now, hopefully will add the demo very soon 🙂 .


registration

login


todoList


hadiList


So That’s it. I can understand, that It would be better if i can give brief in my coding level. Actually I have a plan to make screen cast on it. So for now, just install node, npm, mongoDB. Then clone/download my project and see how awesome is this.

So now Explore the Express.

Hope you will enjoy it. Thanks 🙂

undefined index: columns, one silly and irritating error while using Datatables library

This Error occurred suddenly in one of my project listing page and it takes my lots of hour to find out the solution. That’s why think to share the experience.

What I found after searching is its happened may be for two reason

  • The encoded array from ssp.class.php was not in UTF-8 what is needed for json_encode.
  • And another one reason if the column array is big then the big URL size makes it problem if you are using GET method while server side processing.

So What’s the solution 🙂

First reason’s solution is at SSP Class you have to add following line after PDO connect after line no #272 to define character set.

$db->query("SET NAMES 'utf8'");

Or you can see my cutomised SSP class .

And second reason’s solution is you have to do use POST instead of GET while server side AJAX call.

While assign the URL you have to use HTTP type POST.

"ajax": {
"url": "scripts/post.php",
"type": "POST"
},

And little reminder is at server side script use POST instead of GET variable while calling SSP simple function. Like

$Ssp::simple( $_POST, $sql_details, $table, $primaryKey, $columns)

You can see the POST examples here. 

Hope it may help. 🙂

Thanks

Create Facebook and Twitter button using CSS3

After released CSS3, I have practiced with it’s new features. After watching one tutorial i got an idea to make something nice. Then I am tried to build Facebook and Twitter button using CSS3 without using any image. And try to use some nice CSS tricks to make these button more realistic.

And one thing, I will not discuss the CSS3 new features format and params. I will just show how I have used these feature to create FB and Twitter button. Lets Start How I do that.

demodownload

Here is the List some of CSS3 property I have used to do this:

  • font-face
  • Gradient
  • Border radius
  • Text & Box Shadow
  • Other properties

Font-face

I have used font-face kit from here. To get the Facebook ‘f’ and Twitter ‘t’ I have used that. I have created Font by this font-face kit. And use this font later.

@font-face {
font-family: 'ModernPictogramsNormal';
src: url('font/modernpics-webfont.eot');
src: url('font/modernpics-webfont.eot?#iefix') format('embedded-opentype'),
url('font/modernpics-webfont.woff') format('woff'),
url('font/modernpics-webfont.ttf') format('truetype'),
url('font/modernpics-webfont.svg#ModernPictogramsNormal') format('svg');
font-weight: normal;
font-style: normal;
}

Gradients

You can see Gradients syntax/format here. Then if you want you can make your own Gradient visually Here.

Here My Used Gradient for FB Icon:

/* Background Credients */
    background: #014464;
    background-image: -webkit-gradient(
        linear,
        left bottom,
        left top,
        color-stop(0.4, #2E6C9E),
        color-stop(0.51, #1A5399),
        color-stop(0.6, #2774B8)
        );

Border radius

Border radius is a nice feature of CSS3. You can see the other property here Or you can create visually here.

 /* Border & Border Radius */
    -moz-border-radius:10px;
    -moz-border-radius:10px;
    border-radius:10px;
    border: 1px solid #368DBE;
    border-top: 1px solid #e3d6df;
    border-left: 1px solid #e3d6df;

Text & box shadow

Box-shadow, one of CSS3′s best new features. You can see details of Box shadow here.

To make the button more interactive I have used Text shadow. You can see some use of Text shadow here. here.

  /* Text Shadow */
    text-shadow: 0px -1px 1px #111;

    /* Box shadow */
    -moz-box-shadow: 0 1px 3px black;
    -webkit-box-shadow: 0 1px 3px black;
    box-shadow: 0 3px 8px black;

Others

To make interactive button I have added shadow while button active.

/*     WHILE BEING CLICKED   */
.button:active {
    -moz-box-shadow: 0 2px 6px black;
    -webkit-box-shadow: 0 2px 6px black;
}

Then I have used the Font i have made by font face.

.button:after {
    font-family: ModernPictogramsNormal;
    content: 'F';
    color: #FFF;
    font-size: 60px;
    float: left;
    margin-left: 15px;
    margin-right: -10px;
    text-shadow: 1 1px 1 #4190AF;
}

And here is the other normal CSS I have used for create the button.

.button {
    width: 55px;
    height: 55px;
    line-height: 63px;
    text-decoration: none;
    color: white;
    font-size: 40px;
    font-family: helvetica, arial;
    font-weight: bold;
    display: block;
    text-align: center;
}

I have shown all the CSS I have used for Facebook button. To see the Twitter button source download it from github. And you also can see the inspiring tutorials at Nettuts+

Cheers!!!

Git Basics

In my professional projects first I have used SVN
for source code versioning. Then after introducing with Git I have started use GIT to manage source control. GIT makes you stronger and confident to write code. When multiple developer work in one project then there is no better solution to use GIT to manage their code.

In my office I have taken one session about GIT. Where I have tried to discuss the versioning concepts and its benefits. I have discussed its basics usage and command. And shows some necessary ways to handle critical situation.

Hope you will Enjoy it.

Any review or question will be appreciable. Thanks for watching.

Memcache Installation

What is Memcached?

Free & open source, high-performance, distributed memory object caching system, generic in nature, but intended for use in speeding up dynamic web applications by alleviating database load.

So to faster your application its needed to use the memcache at your application. Lets proceed the main goal for my post.
Lets Install PHP5 Memcache Extension Module for Ubuntu (note: you must have memcached installed prior to installing this extension module. refer to prerequisite install below):

Follow the following steps to install memcache successfully.

  • Install g++ if you haven’t already.
  • sudo apt-get install make g++
    
  • Prerequisite Install
  • # Download & install libevent (memcached dependency)
    # Run the command at CMD
    wget http://www.monkey.org/~provos/libevent-1.4.8-stable.tar.gz
    # Extract the archieve file
    tar xfz libevent-1.4.8-stable.tar.gz
    # Enter the directory
    cd libevent-1.4.8-stable
    # Then install by run following command
    ./configure && make && sudo make install
    
  • Create a symlink to libevent
  • # Run command to symlink
    sudo ln -s /usr/local/lib/libevent-1.4.so.2 /usr/lib
    
  • Download & install memcached
  • # Run the following command in CMD
    # Download memcache latest version
    wget http://danga.com/memcached/dist/memcached-1.2.6.tar.gz
    # Extract the archive file
    tar xfz memcached-1.2.6.tar.gz
    cd memcached-1.2.6
    ./configure && make && sudo make install
    
  • Run the Memcache as a daemon
  • # Run memcached as a daemon (d = daemon, m = memory, u = user, l = IP to listen to, p = port)
    memcached -d -m 1024 -u root -l 127.0.0.1 -p 11211
    
  • PHP5-Memcache Install
  • # Download the extension module
    apt-get install php5-memcache
    
    #Edit /etc/php5/conf.d/memcache.ini and uncomment the following line by removing the semi-colon
    extension=memcache.so
    
    # Restart your apache server
    /etc/init.d/apache2 restart
    
  • Example code to Test Memcache Install
  • <?php
    $memcache = new Memcache;
    $memcache->connect('localhost', 11211) or die ("Could not connect");
    
    $version = $memcache->getVersion();
    echo "Server's version: ".$version."<br/>\n";
    
    $tmp_object = new stdClass;
    $tmp_object->str_attr = 'test';
    $tmp_object->int_attr = 123;
    
    $memcache->set('key', $tmp_object, false, 10) or die ("Failed to save data at the server");
    echo "Store data in the cache (data will expire in 10 seconds)<br/>\n";
    
    $get_result = $memcache->get('key');
    echo "Data from the cache:<br/>\n";
    
    var_dump($get_result);
    ?>
    

Enjoy the caching benefit. Enjoy!!!!!!